
はじめに
Squidは豊富な機能と高い信頼性から広く利用されているプロキシサーバソフトウェアです。この記事では、UbuntuにSquidをインストールし、フォワードプロキシサーバを構築する手順を紹介します。
今回の環境は、Cisco Modeling Labs 2にUbuntuは以下のバージョンを利用します。
cisco@inserthostname-here:~$ lsb_release -a
No LSB modules are available.
Distributor ID: Ubuntu
Description: Ubuntu 22.04.1 LTS
Release: 22.04
Codename: jammy
UbuntuにSquidをインストールするために、外部接続が必要となるため、以下の構成とします。
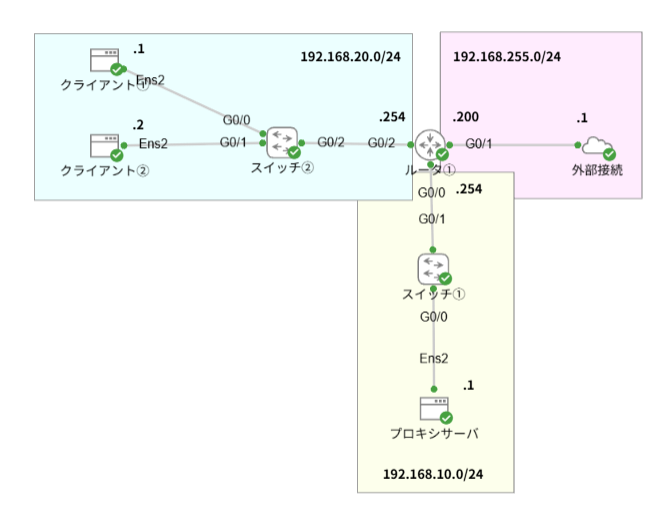
ネットワーク設定
外部との通信は、NAT接続の設定として、ルータには外部接続、プロキシサーバ、クライアント端末のセグメントを3つ設定します。
| 外部セグメント | 192.168.255.0/24 |
| プロキシサーバセグメント | 192.168.10.0/24 |
| クライアント端末セグメント | 192.168.20.0/24 |
ルータ設定
それぞれのインターフェースに第4オクテットを254として割り当てて、デフォルトルートはCML2ホストのNATインターフェースのIPアドレスである192.168.255.1宛てとします。
また、プロキシサーバから外部への通信を可能とするため、ルータにNAPTの設定を投入します。
interface GigabitEthernet0/0
 ip address 192.168.10.254 255.255.255.0
 ip nat inside
 ip virtual-reassembly in
 duplex auto
 speed auto
 media-type rj45
!
interface GigabitEthernet0/1
 ip address 192.168.255.254 255.255.255.0
 ip nat outside
 ip virtual-reassembly in
 duplex auto
 speed auto
 media-type rj45
!
interface GigabitEthernet0/2
 ip address 192.168.20.254 255.255.255.0
 duplex auto
 speed auto
 media-type rj45
!
ip nat inside source list 1 interface GigabitEthernet0/1 overload
ip route 0.0.0.0 0.0.0.0 192.168.255.1
!
access-list 1 permit 192.168.10.0 0.0.0.255
設定完了後に外部との通信を確認するため、GoogleのDNSサーバ(8.8.8.8)へpingを飛ばして疎通を確認します。
inserthostname-here#ping 8.8.8.8
Type escape sequence to abort.
Sending 5, 100-byte ICMP Echos to 8.8.8.8, timeout is 2 seconds:
!!!!!
Success rate is 100 percent (5/5), round-trip min/avg/max = 4/7/14 ms
inserthostname-here#
NAPTの設定に関しては、以下の記事を参考にさせていただきました。
プロキシサーバ設定
プロキシサーバセグメントの第4オクテットを1としてプロキシサーバに割り当てます。
sudo vi /etc/netplan/50-cloud-init.yaml
    ens2:
      dhcp4: false
      addresses: [192.168.10.1/24]
      routes:
        - to: default
          via: 192.168.10.254
ファイルの記載を変更したら、”sudo netplan apply”で設定を反映させます。
sudo netplan apply
設定したIPアドレスが反映されていることを確認します。
cisco@inserthostname-here:~$ ip address show
2: ens2: <BROADCAST,MULTICAST,UP,LOWER_UP> mtu 1500 qdisc fq_codel state UP group default qlen 1000
    inet 192.168.10.1/24 brd 192.168.10.255 scope global ens2
       valid_lft forever preferred_lft forever
ルータへの到達性を確認します。
cisco@inserthostname-here:~$ ping 192.168.10.254
PING 192.168.10.254 (192.168.10.254) 56(84) bytes of data.
64 bytes from 192.168.10.254: icmp_seq=1 ttl=255 time=2.28 ms
64 bytes from 192.168.10.254: icmp_seq=2 ttl=255 time=2.19 ms
64 bytes from 192.168.10.254: icmp_seq=3 ttl=255 time=2.37 ms
^C
--- 192.168.10.254 ping statistics ---
3 packets transmitted, 3 received, 0% packet loss, time 2004ms
rtt min/avg/max/mdev = 2.187/2.279/2.374/0.076 ms
cisco@inserthostname-here:~$
クライアント設定
クライアントに関しては、①を第4オクテットを.1、②の第4オクテットを.2として設定します。
クライアント①
sudo vi /etc/netplan/50-cloud-init.yaml
network:
    ethernets:
        ens2:
            dhcp4: false
            addresses: [192.168.20.1/24]
            routes:
              - to: default
                via: 192.168.20.254
            set-name: ens2
    version: 2
sudo netplan apply
プロキシサーバへの到達性を確認します。
cisco@inserthostname-here:~$ ping -4 -c 3 192.168.10.1
PING 192.168.10.1 (192.168.10.1) 56(84) bytes of data.
64 bytes from 192.168.10.1: icmp_seq=1 ttl=63 time=3.49 ms
64 bytes from 192.168.10.1: icmp_seq=2 ttl=63 time=3.88 ms
64 bytes from 192.168.10.1: icmp_seq=3 ttl=63 time=3.30 ms

--- 192.168.10.1 ping statistics ---
3 packets transmitted, 3 received, 0% packet loss, time 2004ms
rtt min/avg/max/mdev = 3.304/3.557/3.876/0.237 ms
cisco@inserthostname-here:~$
クライアント②
sudo vi /etc/netplan/50-cloud-init.yaml
network:
    ethernets:
        ens2:
            dhcp4: false
            addresses: [192.168.20.2/24]
            routes:
              - to: default
                via: 192.168.20.254
            set-name: ens2
    version: 2
sudo netplan apply
プロキシサーバへの到達性を確認します。
cisco@inserthostname-here:~$ ping -4 -c 3 192.168.10.1
PING 192.168.10.1 (192.168.10.1) 56(84) bytes of data.
64 bytes from 192.168.10.1: icmp_seq=1 ttl=63 time=3.00 ms
64 bytes from 192.168.10.1: icmp_seq=2 ttl=63 time=3.88 ms
64 bytes from 192.168.10.1: icmp_seq=3 ttl=63 time=3.46 ms

--- 192.168.10.1 ping statistics ---
3 packets transmitted, 3 received, 0% packet loss, time 2002ms
rtt min/avg/max/mdev = 2.997/3.445/3.880/0.360 ms
cisco@inserthostname-here:~$
ホスト名を恒久的に変更する方法
sudo vi /etc/hosts でホスト名を書き替えて、sudo rebootで設定を反映させることで、変更ができます。
Squidのインストール
まず、SquidをUbuntuにインストールします。以下の手順を順番に実行してください。
パッケージリストの更新
sudo apt updatecisco@ProxyServer:~$ sudo apt update
Hit:1 http://archive.ubuntu.com/ubuntu jammy InRelease
Get:2 http://security.ubuntu.com/ubuntu jammy-security InRelease [129 kB]
Get:3 http://archive.ubuntu.com/ubuntu jammy-updates InRelease [128 kB]
Get:4 http://security.ubuntu.com/ubuntu jammy-security/main amd64 Packages [2465 kB]
Get:5 http://archive.ubuntu.com/ubuntu jammy-backports InRelease [127 kB]
Get:6 http://archive.ubuntu.com/ubuntu jammy-updates/main amd64 Packages [2711 kB]
Get:7 http://archive.ubuntu.com/ubuntu jammy-updates/main Translation-en [433 kB]
Get:8 http://archive.ubuntu.com/ubuntu jammy-updates/restricted amd64 Packages [3860 kB]
Get:9 http://archive.ubuntu.com/ubuntu jammy-updates/restricted Translation-en [694 kB]
Get:10 http://security.ubuntu.com/ubuntu jammy-security/main Translation-en [369 kB]
Get:11 http://archive.ubuntu.com/ubuntu jammy-updates/universe amd64 Packages [1219 kB]
Get:12 http://security.ubuntu.com/ubuntu jammy-security/restricted amd64 Packages [3742 kB]
Get:13 http://archive.ubuntu.com/ubuntu jammy-updates/universe Translation-en [301 kB]
Get:14 http://archive.ubuntu.com/ubuntu jammy-updates/multiverse amd64 Packages [47.1 kB]
Get:15 http://archive.ubuntu.com/ubuntu jammy-updates/multiverse Translation-en [12.0 kB]
Get:16 http://security.ubuntu.com/ubuntu jammy-security/restricted Translation-en [675 kB]
Get:17 http://security.ubuntu.com/ubuntu jammy-security/universe amd64 Packages [987 kB]
Get:18 http://security.ubuntu.com/ubuntu jammy-security/universe Translation-en [213 kB]
Get:19 http://security.ubuntu.com/ubuntu jammy-security/multiverse amd64 Packages [40.3 kB]
Get:20 http://security.ubuntu.com/ubuntu jammy-security/multiverse Translation-en [8908 B]
Fetched 18.2 MB in 1min 22s (221 kB/s)
Reading package lists... Done
Building dependency tree... Done
Reading state information... Done
107 packages can be upgraded. Run 'apt list --upgradable' to see them.
cisco@ProxyServer:~$Squidのインストール
sudo apt install squid -y
Package configuration


  ーーーーーーーーーーーーーー Pending kernel upgrade ーーーーーーーーーーーーーー
  x                                                                          x
  x Newer kernel available                                                   x
  x                                                                          x
  x The currently running kernel version is 5.15.0-52-generic which is not   x
  x the expected kernel version 5.15.0-143-generic.                          x
  x                                                                          x
  x Restarting the system to load the new kernel will not be handled         x
  x automatically, so you should consider rebooting.                         x
  x                                                                          x
  x                                  <Ok>                                    x
  x                                                                          x
  ーーーーーーーーーーーーーーーーーーーーーーーーーーーーーーーーーーーーーーーーー
Package configuration

                ーーー Daemons using outdated libraries ーーーー
                x                                             x
                x                                             x
                x Which services should be restarted?         x
                x                                             x
                x    [*] cron.service                     ↑   x
                x    [ ] dbus.service                     `   x
                x    [ ] getty@tty1.service               a   x
                x    [ ] ModemManager.service             a   x
                x    [*] multipathd.service               a   x
                x    [ ] networkd-dispatcher.service      a   x
                x    [*] packagekit.service               a   x
                x    [*] polkit.service                   a   x
                x    [*] rsyslog.service                  a   x
                x    [*] ssh.service                      ↓   x
                x                                             x
                x                                             x
                x          <Ok>              <Cancel>         x
                x                                             x
                ーーーーーーーーーーーーーーーーーーーーーーーーーー
以下の出力でエラーとなった場合、DNS設定の不備が考えられます。
Temporary failure resolving ‘archive.ubuntu.com’
エラーが出た方は以下の記事に記載の方法で解決できるかを試してみてください。

インストールが完了したら、以下の設定を追加または有効化して、ローカルネットワークからのアクセスを許可します。
sudo vi /etc/squid/squid.conf
acl localnet src 192.168.10.0/24
http_access allow localnet
設定を保存したら、Squidサービスを有効化して起動します。
sudo systemctl enable squid
sudo systemctl start squid
cisco@ProxyServer:~$ sudo systemctl enable squid
Synchronizing state of squid.service with SysV service script with /lib/systemd/systemd-sysv-install.
Executing: /lib/systemd/systemd-sysv-install enable squid
sudo systemctl status squid
cisco@ProxyServer:~$ sudo systemctl status squid
● squid.service - Squid Web Proxy Server
     Loaded: loaded (/lib/systemd/system/squid.service; enabled; vendor preset:>
     Active: active (running) since Sat 2025-07-05 06:09:01 UTC; 9min ago
       Docs: man:squid(8)
    Process: 69504 ExecStartPre=/usr/sbin/squid --foreground -z (code=exited, s>
   Main PID: 69508 (squid)
      Tasks: 4 (limit: 2324)
     Memory: 17.8M
        CPU: 137ms
     CGroup: /system.slice/squid.service
             tq69508 /usr/sbin/squid --foreground -sYC
             tq69510 "(squid-1)" --kid squid-1 --foreground -sYC
             tq69511 "(logfile-daemon)" /var/log/squid/access.log
             mq69512 "(pinger)"
これで、Squidがインストールされ、起動している状態になります。
クライアント側でブラウザやcurlのプロキシ設定にサーバのIPアドレス(例: 192.168.10.1:3128)を指定し、通信できるか確認します。
curl -v -x 192.168.10.1:3128 http://example.com
以下が出力されていれば、サーバ自身からのsquidの動作確認はOKとなります。
cisco@ProxyServer:~$ curl -v -x 192.168.10.1:3128 http://example.com
*   Trying 192.168.10.1:3128...
* Connected to (nil) (192.168.10.1) port 3128 (#0)
> GET http://example.com/ HTTP/1.1
> Host: example.com
> User-Agent: curl/7.81.0
> Accept: */*
> Proxy-Connection: Keep-Alive
>
* Mark bundle as not supporting multiuse
< HTTP/1.1 200 OK
< Content-Type: text/html
< ETag: "84238dfc8092e5d9c0dac8ef93371a07:1736799080.121134"
< Last-Modified: Mon, 13 Jan 2025 20:11:20 GMT
< Cache-Control: max-age=1646
< Date: Sat, 05 Jul 2025 06:09:07 GMT
< Content-Length: 1256
< X-Cache: MISS from ProxyServer
< X-Cache-Lookup: MISS from ProxyServer:3128
< Via: 1.1 ProxyServer (squid/5.9)
< Connection: keep-alive
~省略~
< HTTP/1.1 200 OK
< Via: 1.1 ProxyServer (squid/5.9)
クライアントを利用したアクセス確認
プロキシサーバ(Squid)の設定が完了したら、実際にクライアントからプロキシサーバを経由して接続できるかを検証します。
ここでは、curlコマンドを使ったテスト と ブラウザからの接続確認 の2つの方法を紹介します。
curlコマンドでの検証(クライアントから)
Ubuntuクライアントから、curlコマンドでSquidプロキシ経由の通信をテストします。
curl -x http://192.168.10.1:3128 http://example.com
cisco@Client01:~$ curl -x http://192.168.10.1:3128 http://example.com
<!doctype html>
<html>
<head>
    <title>Example Domain</title>

    <meta charset="utf-8" />
    <meta http-equiv="Content-type" content="text/html; charset=utf-8" />
    <meta name="viewport" content="width=device-width, initial-scale=1" />
    <style type="text/css">
    body {
        background-color: #f0f0f2;
        margin: 0;
        padding: 0;
        font-family: -apple-system, system-ui, BlinkMacSystemFont, "Segoe UI", "Open Sans", "Helvetica Neue", Helvetica, Arial, sans-serif;

    }
    div {
        width: 600px;
        margin: 5em auto;
        padding: 2em;
        background-color: #fdfdff;
        border-radius: 0.5em;
        box-shadow: 2px 3px 7px 2px rgba(0,0,0,0.02);
    }
    a:link, a:visited {
        color: #38488f;
        text-decoration: none;
    }
    @media (max-width: 700px) {
        div {
            margin: 0 auto;
            width: auto;
        }
    }
    </style>
</head>

<body>
<div>
    <h1>Example Domain</h1>
    <p>This domain is for use in illustrative examples in documents. You may use this
    domain in literature without prior coordination or asking for permission.</p>
    <p><a href="https://www.iana.org/domains/example">More information...</a></p>
</div>
</body>
</html>期待する出力として、example.com のHTMLが表示されれば成功です。
ブラウザ経由でプロキシの挙動を確認
まずはプロキシサーバの設定をしない状態でのインターネットへの接続状態を確認します。
curl -I http://www.google.com
cisco@Client01:~$ curl -I http://www.google.com
curl: (6) Could not resolve host: www.google.com
続いて、ターミナルで次の環境変数を設定します。
export http_proxy=http://192.168.10.1:3128/
export https_proxy=http://192.168.10.1:3128/
cisco@Client01:~$ export http_proxy=http://192.168.10.1:3128/
cisco@Client01:~$
cisco@Client01:~$ export https_proxy=http://192.168.10.1:3128/これで、そのシェルセッション内のHTTP/HTTPS通信がプロキシ経由になります。
curl -I http://www.google.com
cisco@Client01:~$ curl -I http://www.google.com
HTTP/1.1 200 OK
Content-Type: text/html; charset=ISO-8859-1
Content-Security-Policy-Report-Only: object-src 'none';base-uri 'self';script-src 'nonce-zOsEhX7nGKKrYBTYturRsw' 'strict-dynamic' 'report-sample' 'unsafe-eval' 'unsafe-inline' https: http:;report-uri https://csp.withgoogle.com/csp/gws/other-hp
P3P: CP="This is not a P3P policy! See g.co/p3phelp for more info."
Date: Sat, 05 Jul 2025 11:52:49 GMT
Server: gws
X-XSS-Protection: 0
X-Frame-Options: SAMEORIGIN
Expires: Sat, 05 Jul 2025 11:52:49 GMT
Cache-Control: private
Set-Cookie: AEC=AVh_V2i0LNC0t_VA7N2R0t9wfhdYLpG0q6nH64HPiRkoOr6mDcR-gAc1uEo; expires=Thu, 01-Jan-2026 11:52:49 GMT; path=/; domain=.google.com; Secure; HttpOnly; SameSite=lax
Set-Cookie: NID=525=cHeEWwd7Q5Nhl9DgbIPc6WsIcQunxmus1eAbZPLXnYp1Vt7tzCsNFyHg2u6iRFgZshAfSVJHnqn9pfuCEplHHETrP9FZ6JlCcrLURis60BxdtmPLrVtXYxjecXrdoyiy3R6d8Hcf7zYBQj4NYAOsprgEY3fRBisnRD0d2oftAouHKlNbjgej7QSEMaYivrl_MDawzKNtTMAsgA; expires=Sun, 04-Jan-2026 11:52:49 GMT; path=/; domain=.google.com; HttpOnly
X-Cache: MISS from ProxyServer
X-Cache-Lookup: MISS from ProxyServer:3128
Via: 1.1 ProxyServer (squid/5.9)
Connection: keep-alive
curl -I https://www.google.com
cisco@Client01:~$ curl -I https://www.google.com
HTTP/1.1 200 Connection established

HTTP/2 200
content-type: text/html; charset=ISO-8859-1
content-security-policy-report-only: object-src 'none';base-uri 'self';script-src 'nonce-9gSOOQsEptTpxw2q0xE96A' 'strict-dynamic' 'report-sample' 'unsafe-eval' 'unsafe-inline' https: http:;report-uri https://csp.withgoogle.com/csp/gws/other-hp
accept-ch: Sec-CH-Prefers-Color-Scheme
p3p: CP="This is not a P3P policy! See g.co/p3phelp for more info."
date: Sat, 05 Jul 2025 11:54:17 GMT
server: gws
x-xss-protection: 0
x-frame-options: SAMEORIGIN
expires: Sat, 05 Jul 2025 11:54:17 GMT
cache-control: private
set-cookie: AEC=AVh_V2jecRhLYe-vcSP5h8CxCc49obvMDxgJSRIET9VhcVY-2YIWgHZ2PA; expires=Thu, 01-Jan-2026 11:54:17 GMT; path=/; domain=.google.com; Secure; HttpOnly; SameSite=lax
set-cookie: NID=525=hjwjzMVhUy4eK7xXppQ27MHstmHQZqTJgMCKc_rDQKymVzU9yghI2m3E4LGNyJP6mI7NwsdSHPYRBCN0NBl5zfZcjaa5tYroOcqnSzN3PvPMoIC2F3moNQs2v52cD6_QSsvmM6R1Vqkjt50jAWKCUBwcZ4_ZAZuYyoJnNZ_V8ZHXU4x07jQZO0J8xnGzCfeE1tANR85-3LpDaA; expires=Sun, 04-Jan-2026 11:54:17 GMT; path=/; domain=.google.com; HttpOnly
alt-svc: h3=":443"; ma=2592000,h3-29=":443"; ma=2592000
Squidのログで確認
プロキシを経由した通信は、サーバ側のSquidログに記録されます。
以下のコマンドでアクセスログをリアルタイムに確認できます。
sudo tail -f /var/log/squid/access.log
ログ例:
cisco@ProxyServer:~$ sudo tail -f /var/log/squid/access.log
1751714973.175      0 192.168.20.1 TCP_MEM_HIT/200 1635 GET http://example.com/ - HIER_NONE/- text/html
1751715114.647      0 192.168.20.1 NONE_NONE/400 3880 GET / - HIER_NONE/- text/html
1751715149.819      0 192.168.20.1 TCP_MEM_HIT/200 1636 GET http://example.com/ - HIER_NONE/- text/html
1751716369.883    116 192.168.20.1 TCP_MISS/200 1157 HEAD http://www.google.com/ - HIER_DIRECT/172.217.26.228 text/html
1751716457.653    247 192.168.20.1 TCP_TUNNEL/200 5681 CONNECT www.google.com:443 - HIER_DIRECT/172.217.26.228 -
クライアントのIPアドレスが記録されていれば、プロキシ経由で通信できていることが確認できます。
トラブルシューティング
接続がうまくいかない場合は、以下の項目を確認してください。
- Squidが起動しているか
sudo systemctl status squid
- ファイアウォールでポート3128が開放されているか
sudo ufw allow 3128- ACL設定が正しいか
/etc/squid/squid.confのaclとhttp_accessを見直し、sudo systemctl restart squidで反映します。 - エラーログの確認
sudo tail -f /var/log/squid/cache.logまとめ
この記事では、Squidを利用して構築したプロキシサーバに対して、クライアントから接続確認を行う方法を紹介しました。
curlコマンドやブラウザを用いた検証、さらにサーバのログを確認することで、プロキシ経由の通信を確認できます。
エラーが発生した場合も、設定とログを順に確認していけば解決できますので、落ち着いて対応しましょう。